Part 1 of 4 of the series "Learn React by Building a Real App".
Note: Non-profit educational fan project. Not affiliated with, sponsored or endorsed by Nintendo, Game Freak or The Pokémon Company. Pokémon and their names are trademarks of their respective owners. Data provided by PokéAPI.
You open an online store, type "sneakers" into the search box, and the list changes as you type,
without reloading the page. You tap a favorite and the heart fills in right away. Behind something
that ordinary sits a problem that was solved by hand for years: keeping what you see on screen in
step with the data.
React was born for that problem. In this series you learn it by building Dex 506, a trainer's
Pokédex: browse the first 151 Pokémon, open each one's page, build a team of six, and challenge
eight made-up gyms in Costa Rica. I like understanding the whole path of an application, from the
server to the screen, and in this series we walk it together, with React as the interface piece.
How to read this guide. If you have never used React or TypeScript, read the main text: it goes
step by step and assumes nothing beyond basic JavaScript. The Going deeper boxes start closed:
some review JavaScript you will need (open them if the topic is unfamiliar) and others hold the
fine detail for people who already work with another framework. At the end there is a table for
those coming from Vue or Angular. The examples' code is in English, but the text they show on
screen is in Spanish (Favoritos is favorites, Buscar is search, Nivel is level).
I ran all of the code with React 19.3.1, TypeScript 7.0.2, Vite 8.3.8, and Tailwind CSS 4.3.5:
every example has automated tests that pass, and the error messages you see are the ones the tools
printed, copied from their output.
By the end of this part you will be able to:
explain the problem React solves;
create a React project with TypeScript using Vite;
explain why TypeScript exists and type a component's props;
build components with props, state, events, lists, and styles;
put together a small Pokédex with search by name and a filter by type.
Before You Start
In this section you will see where the series ends up and how to use the examples.
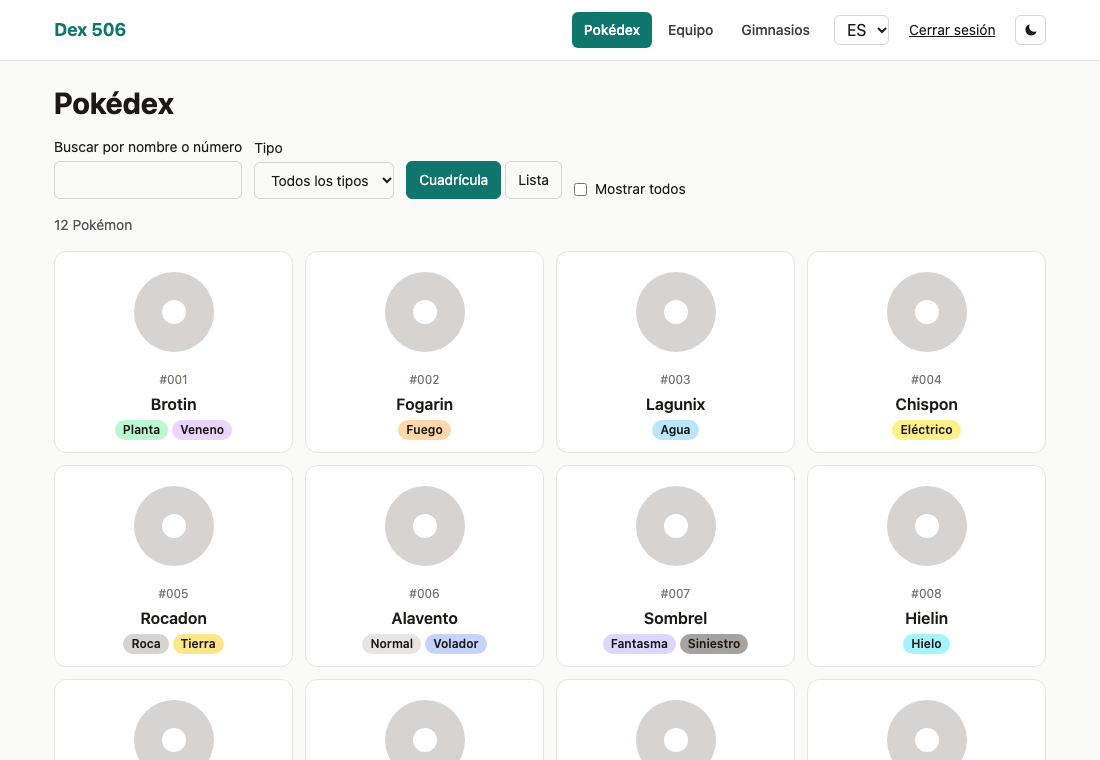
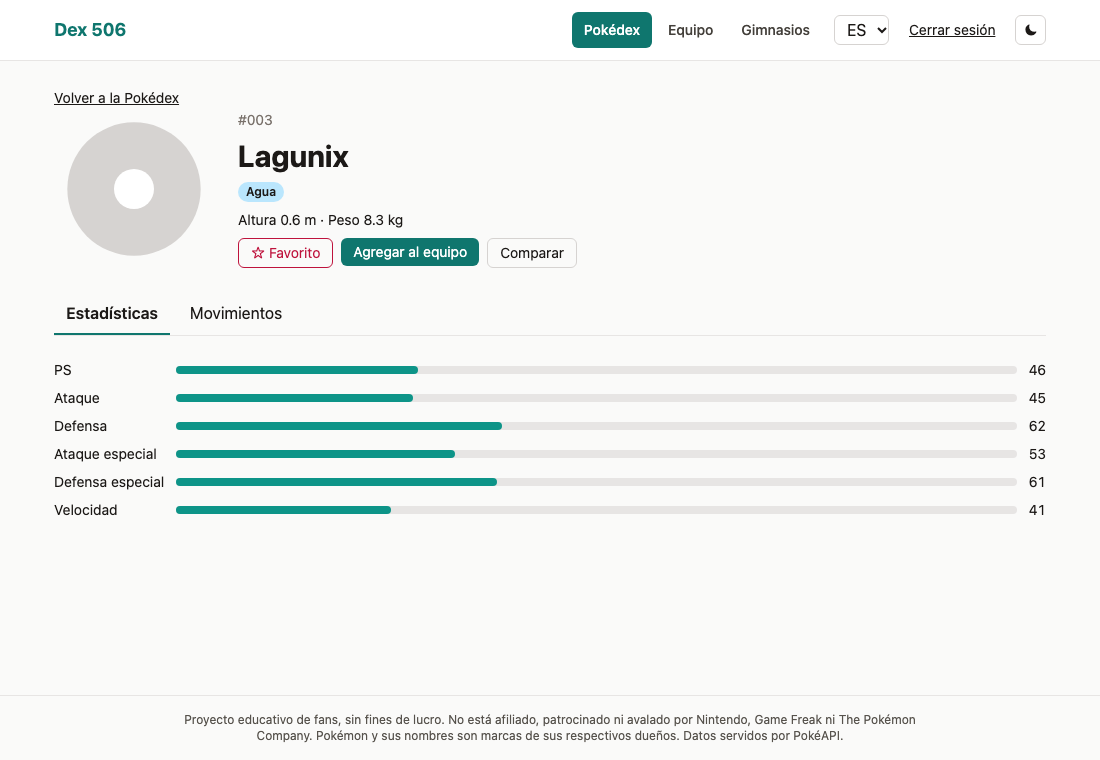
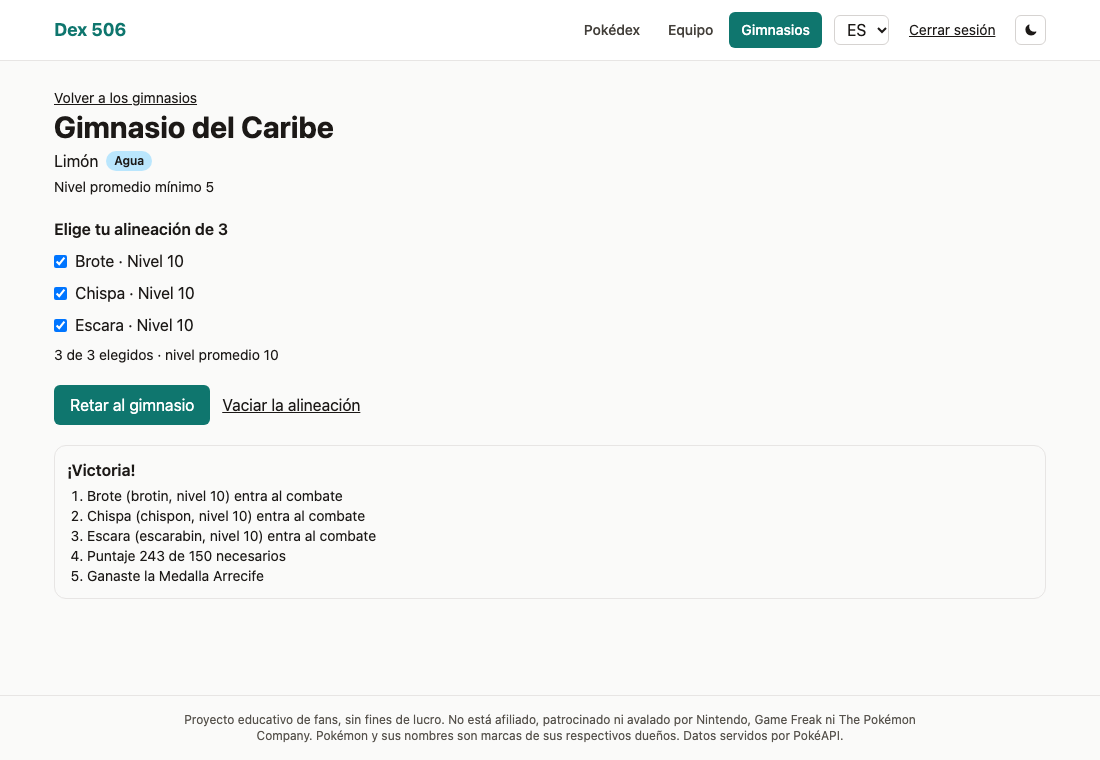
This is what you will build in part 4: the complete Dex 506, with its Pokédex, each Pokémon's
page, your team, and the gyms. The screenshots use made-up creatures, the same ones the app is
tested with; with the real data from PokéAPI (a free public API with Pokémon data), each card shows
its Pokémon. In this part 1 you work with six made-up creatures, which you will see in the first
data example.
The series has four parts, and each one requires the previous one:
Part
Level
What you learn
1
From scratch
Components, props, TypeScript, state, events, lists, and styles
2
Intermediate
Effects, server data, routing, Context, forms, and global state
3
Advanced
How React renders, custom hooks, performance, React 19, testing, and architecture
4
Hands-on
Dex 506 from an empty folder to a production build, with its Node API
This series does not teach JavaScript from scratch. If you are not comfortable with it yet, start
with MDN's JavaScript Guide and
come back once you write functions, arrays, and objects without thinking about it.
The examples in this part are complete in the text, imports included: you can copy them into the
project you create in "Your First Project with Vite". Each code block's title tells you which
folder the file goes in, like src/data/pokemon.ts. The code for the part 4 app can be downloaded
step by step from the part 4 article.
What React Is and Why It Exists
In this section you will see the problem React solves and the idea that sets it apart.
The problem: the screen and the data drift apart
A web page is a tree of elements: a heading, a list, a button. The browser represents it with the
DOM (Document Object Model): the tree of objects JavaScript can read and change to modify what
you see. To work with it, the browser provides functions such as querySelector (finds an
element), addEventListener (reacts to a click), and the textContent property (an element's
text).
For years, showing a change was your job: decide which element to touch and write the new value
into it. This favorites counter, in JavaScript without React, does exactly that:
The first block is imperative: it tells the browser every step. Find the text, add one, write
the number. For a counter, that works. For a whole application, every piece of data that changes
can affect several places on the screen, and remembering all of them is on you.
The second is declarative: it describes what the screen looks like for a given value of
count, and React makes sure the DOM matches. You do not need to understand its syntax yet: you
will write useState yourself in "State and Events", and the tags inside JavaScript in "Components
and JSX". What matters now is the difference: there is no textContent anywhere.
How it started
React was born inside Facebook. Pete Hunt, from the React team, put it this way: in a traditional
JavaScript application you have to look at what data changed and imperatively change the DOM; React
shines when your data changes over time (Pete Hunt, Why did we build React?). Facebook released
React as open source on May 29, 2013 (the facebook/react repository, "Initial public release"
commit).
The words you will use
React is a JavaScript library for building interfaces. A library is code you call when you
need it. A framework, on the other hand, defines your application's structure and is the one
that calls your code. React handles the interface and leaves the rest (navigation, data) to other
libraries; in part 2 you will pick them.
A component is a piece of the interface with a name of its own, like Counter. Technically, it
is a JavaScript function that returns a description of what is on screen. A React application is a
tree of components: a page contains a list, the list contains cards.
To render is what React does when it calls your component to find out what to show. It does so
when the component's state changes (you will see it later) or when the component that uses it
renders again, passing it its new data. It compares the
new result with the previous one, and that comparing is called reconciliation; then it applies
to the DOM only what changed, a step called the commit.
For now, think of it this way: the interface is a function of the data, in the mathematical sense:
for the same data, the same screen. In part 3 you will see what React does inside and why that
sentence is a good approximation, not the whole story.
The JavaScript React Requires
In this section you will review the parts of JavaScript React uses all the time.
React is written in JavaScript. The only thing it adds is JSX, a way to write tags inside your code
that you will see in "Components and JSX". So what a template directive does in other frameworks
(a special instruction inside the HTML, like v-for in Vue), plain JavaScript does in React.
Every example in this part uses these six made-up creatures, each with an id, a name, and its
types. They are the data in src/data/pokemon.ts, which you will put together in full in "Why
TypeScript Exists", once you see how to describe its shape:
If any of these JavaScript tools feels unfamiliar, open its box before moving on:
Going deeper
map and filter. Both walk an array and return a new one without changing
the original: filter keeps the elements that meet a condition, and map transforms each one. In
React you will build lists this way.
With the creatures above, grassNames is ['Brotín', 'Escarabín']: the two with the grass
type.
Going deeper
Arrow functions, destructuring, and spread. An arrow function
((x) => x + 1) is a short way to write a function. Destructuring pulls an object's
properties into variables, and spread (...) copies an object's properties into a new one.
renamed is a new object with the name changed; lagunix was not touched. Creating new data
instead of modifying what exists is called immutability, and React needs it to know what
changed. One detail: spread copies only the first level. renamed.types and lagunix.types are
the same array.
Destructuring also works with arrays: it takes the elements by position. You will use it in
"State and Events".
src/js/transform.ts
const [first, second] = ['Brotín', 'Fogarín']
Going deeper
Modules. Each file is a module: whatever it wants to share it marks with
export, and another file brings it in with import { name } from './file'. A file can also have
a default export (export default), imported without braces: import App from './App'. And
import './index.css', with no name, just loads that file.
Going deeper
Callbacks, promises, and async/await. A callback is a function you
pass to another so it can call it: the one you pass to map is a callback. Asking a server for
data takes time, and JavaScript does not stand still waiting: it moves on and tells you later by
calling a callback. A promise is an object that represents that future result. With
async/await, code that waits on a promise reads top to bottom. All three versions ask a
fake server for the same thing:
src/js/fetching.js
import { creatures } from '../data/pokemon.ts'// Un «servidor» de mentira: responde después de 10 ms, como lo haría uno real tras la red.export function findWithCallback(id, done) { setTimeout(() => done(creatures.find((creature) => creature.id === id)), 10)}
src/js/fetching.js
export function find(id) { return new Promise((resolve) => { setTimeout(() => resolve(creatures.find((creature) => creature.id === id)), 10) })}
callback: Fogarínpromesa: Lagunixasync: Rocadón: rock / ground
A function that remembers the variables of the place where it was created, even when it runs
later, is a closure: the setTimeout callback in findWithCallback remembers id and
done. React's event handlers, which you will see in "State and Events", are closures too.
Your First Project with Vite
In this section you will create a React project and walk through its files.
Why a tool to create the project
A React project needs several pieces before the first line: translating JSX and TypeScript into
JavaScript (you will see both in the next sections), bundling the files for the browser, and
reloading the page while you work. They used to be configured by hand. Today a tool creates the
project ready to go.
A bundler packs your files and their dependencies (the libraries your project uses) into the
few files the browser downloads. Vite is the tool this series uses: it creates the project,
starts a development server (a local server that shows your app as you write it), and produces
the production build, the final optimized version you publish.
Creating the project
You will need Node.js, the program that runs JavaScript outside the browser. Vite requires Node
20.19 or later, or 22.12 or later (Vite, Getting Started); this series uses Node 26, the current
LTS (long-term support) version. Node comes with npm, the package manager: packages are
published libraries, and npm downloads them. In the terminal:
npm create vite@latest mi-pokedex -- --template react-tscd mi-pokedexnpm installnpm run dev
The first line runs create-vite, Vite's project creator, with the react-ts template (React with
TypeScript); the -- in the middle makes the --template option reach create-vite and not npm.
npm install downloads the dependencies, and npm run dev starts the development server. The
terminal shows you an address (http://localhost:5173); open it in the browser.
With the server running, change some text in src/App.tsx and save: the page updates without
reloading. That is HMR (Hot Module Replacement): Vite swaps only the module that changed.
The files
You will see .tsx and .ts files: they are TypeScript, with and without JSX. For now, read them
as JavaScript; in "Why TypeScript Exists" you will see why they exist.
index.html is the page the browser loads. It has an empty div with id="root" and loads
src/main.tsx:
import { StrictMode } from 'react'import { createRoot } from 'react-dom/client'import './index.css'import App from './App.tsx'createRoot(document.getElementById('root')!).render( <StrictMode> <App /> </StrictMode>,)
createRoot creates the React root inside div#root, and render draws the App component
there.
StrictMode is an invisible React component: in development it runs extra checks to warn you
about common mistakes. In part 2 you will see one of its visible effects.
The ! after getElementById(...) assures TypeScript that the result is not null. It does not
check: if the element were missing, it would fail at runtime.
App.tsx default-exports the main component, App.
To try an example from this guide, import it in src/App.tsx and return it from App. With the
counter from "What React Is", App.tsx looks like this:
src/App.tsx
import { Counter } from './Counter'export default function App() { return <Counter />}
Components and JSX
In this section you will write your first component.
The problem: a whole interface in one place
If you write the whole interface in a single file, every change makes you read all of it.
Components split it into named pieces that you write and test separately.
A function component
A function component is a JavaScript function that returns what is on screen and whose name
starts with an uppercase letter. The capital letter is not cosmetic: in JSX, a lowercase <p> is an
HTML tag, and an uppercase <StaticCard> is a component of yours. This is a Pokémon card, still
with fixed data:
That HTML inside JavaScript is JSX: an extension of JavaScript's syntax that looks like HTML and
is translated into JavaScript calls before it reaches the browser. To use the component, you write
it as a tag: <StaticCard />.
Three JSX rules you will use all the time:
Curly braces { } insert a JavaScript expression: a variable, a sum, a function call.
Anything that produces a value. An if produces no value, so it does not go inside braces; in
"Conditionals and Lists" you will see how to choose what to show.
className instead of class, matching the className property of DOM elements (class is
also a reserved word in JavaScript).
Each JSX block has a single root element. If you need several without an extra wrapper, wrap
them in a Fragment: <>…</>, an empty tag that does not appear in the DOM.
Here the braces show the name in uppercase and the number with three digits: #003.
Common mistakes
The usual mistake: returning two elements without a wrapper.
two-roots.tsx
export function TwoRoots() { return ( <h2>Lagunix</h2> <p>water</p> )}
two-roots.tsx(3,5): error TS2657: JSX expressions must have one parent element.
The fix is to wrap them in an <article> or in a Fragment <>…</>.
The usual mistake: writing class, as in HTML.
class-attribute.tsx
export function WithClass() { return <article class="pokemon-card">Lagunix</article>}
class-attribute.tsx(2,19): error TS2322: Type '{ class: string; children: string; }' is not assignable to type 'DetailedHTMLProps<HTMLAttributes<HTMLElement>, HTMLElement>'.
  Property 'class' does not exist on type 'DetailedHTMLProps<HTMLAttributes<HTMLElement>, HTMLElement>'. Did you mean 'className'?
The message already tells you the fix: className. The rest is the full description of the
attributes an HTML tag accepts in React; the word "children" is the text inside the tag, and you
will see it in the next section.
Props and children
In this section you will make a component receive data.
The problem: a card that always says the same thing
StaticCard always shows Lagunix. To show any creature, the component has to receive its data from
outside.
Props
Props are the data a component receives from whoever uses it. Technically, React gathers the
attributes you write on the tag (<TypeBadge type="grass" />) into an object and passes it to the
function as its first argument. That is why it is read with destructuring:
src/props/TypeBadge.tsx
export function TypeBadge({ type }: { type: string }) { return <span className="type-badge">{type}</span>}
The : { type: string } describes what it receives: a type prop that is a string. Write it like
this for now. Without that description, the editor flags an error:
Before
untyped-props.tsx
export function TypeBadge({ type }) { return <span className="type-badge">{type}</span>}
After
untyped-props.tsx(1,29): error TS7031: Binding element 'type' implicitly has an 'any' type.
The message says that the name type, which you pulled out with destructuring (a binding
element), has no declared type. In "Why TypeScript Exists" you will see why that is an error and
how types are written.
Props are read-only: a component does not change the ones it receives. If a piece of data has
to change, whoever passes it changes it; in "State and Events" you will see how.
A prop can have a default value, for when nobody passes it. The ? marks it as optional:
src/props/LevelBadge.tsx
export function LevelBadge({ level = 1 }: { level?: number }) { return <span className="level">Nivel {level}</span>}
<LevelBadge /> shows "Nivel 1" (level 1).
children and composition
Sometimes a component does not know in advance what it will wrap, like a card that can hold
anything. That is what children is for: the special prop holding what you write between the
opening tag and the closing one. Its type, ReactNode, means "anything React can display", and it
is imported from react with import type, the way to import only a type.
src/props/Card.tsx
import type { ReactNode } from 'react'export function Card({ title, children }: { title: string; children: ReactNode }) { return ( <section className="card"> <h2>{title}</h2> {children} </section> )}
Building larger components by placing some inside others is called composition:
src/props/Composition.tsx
import { Card } from './Card'import { TypeBadge } from './TypeBadge'export function BrotinCard() { return ( <Card title="Brotín"> <TypeBadge type="grass" /> <TypeBadge type="poison" /> </Card> )}
Card knows nothing about Pokémon types, and TypeBadge knows nothing about cards. Each does one
thing, and together they make the page.
Why TypeScript Exists
By the end of this section you will be able to read the TypeScript types that show up in the rest
of the series and make sense of its error messages.
The problem: a mistake nobody reports
In the previous section you saw that a component receives data through props. Now picture a card
that receives a creature's name (name) and types (types), and a typo when you use it: you write
nmae instead of name.
src/App.jsx
import { PokemonCard } from './PokemonCard'export default function App() { return <PokemonCard nmae="Brotín" types={['grass', 'poison']} />}
See what happens with the card in JavaScript and with the same card in TypeScript, which adds a
description of the props it accepts. In that description, string is a piece of text and
string[] is an array of them. (To try the JavaScript version, create a project with the react
template instead of react-ts.)
App.tsx(4,23): error TS2322: Type '{ nmae: string; types: string[]; }' is not assignable to type 'IntrinsicAttributes & PokemonCardProps'.
  Property 'nmae' does not exist on type 'IntrinsicAttributes & PokemonCardProps'.
In JavaScript, no error shows up. The app starts, the card appears, and the heading is empty:
since nobody passed name, its value is undefined, and React renders nothing on screen for
undefined. I checked it with an automated test for the example: the heading renders with no
text. Whoever uses the app finds out.
In TypeScript, the error appears without running anything. The message above is what tsc,
the TypeScript compiler (a program that translates and checks the code; more on it below), prints
when it checks App.tsx: the same code as App.jsx, with the TypeScript extension. Here is how to
read it:
App.tsx(4,23) is the file, line, and column: line 4, where nmae is.
TS2322 is the error code, handy for searching.
IntrinsicAttributes are the attributes React accepts on any component, such as key, which you
will see in "Conditionals and Lists". The & joins that type with PokemonCardProps.
The second line says what matters: nmae is not one of the card's props.
In PokemonCard.tsx, the annotation : PokemonCardProps describes the whole props object, from
which the function pulls name and types.
Watch out: Vite's development server does not check types: it only strips them so the
browser can run the code (Vite, Features). If you ignore the error, npm run dev starts anyway
and you see the card without a name. Your editor catches it as you type, and so does the
template's npm run build, which runs tsc before producing the build. Treat every red line as a
real error.
Where it comes from
This is not a new problem. On October 1, 2012, Microsoft introduced TypeScript with a concrete
goal: getting JavaScript development to scale to large applications (S. Somasegar, TypeScript:
JavaScript Development at Application Scale).
In March 2025 the team announced it would port the compiler and the editor tooling to Go, a
language that compiles to machine code, to make them about ten times faster (Anders Hejlsberg, A
10x Faster TypeScript). That version shipped on July 8, 2026 as TypeScript 7 (Daniel Rosenwasser,
Announcing TypeScript 7.0), and it is the one this series uses. For you, what changes is speed:
errors show up sooner in the editor. The language you write is the same.
Types, one at a time
JavaScript has dynamic typing: a variable can hold a number and later a string, and nothing is
checked before the code runs. A type error, if it shows at all, shows at runtime; and often it does
not show, like the nmae above. With static typing, the type of every variable, prop, or
parameter is known before running, and a program checks that the code does not contradict it.
A type describes which values a variable, a prop, or a parameter accepts. Put precisely, it is
a set of possible values: number accepts 5 and 3.14; string, any text.
A type annotation is that type written by hand after a colon: in name: string, the annotation
is string. You do not always have to write it. With type inference, TypeScript works out the
type from the value:
src/typescript/basics.ts
let level = 5level = level + 1
level started as 5, so TypeScript infers it is a number, and rejects giving it a string
later:
Before
level-as-text.ts
let level = 5level = 'five'
After
level-as-text.ts(2,1): error TS2322: Type 'string' is not assignable to type 'number'.
To describe an object with a name of its own you have two options, type and interface. For a
card's props, both say the same thing:
There are fine differences between them; they are in the "Going deeper" box at the end of this
section. This series uses type, because it also covers unions, which come next, and interface
does not.
type also describes the examples' data. This is the complete file: Creature describes a
creature, and Creature[] means "an array of Creature", the type of the creatures list the
other examples import:
A union is a type that accepts one option out of several, separated by |. It can join broad
types, like string | null ("a string or nothing"), or specific values. A specific string, such as
'grid', is a type too: the one that accepts only that string. It is called a literal type.
With a union of literal types you describe a value that can only be one of a few strings, like the
Pokédex view:
type View = 'grid' | 'list'const view: View = 'table'
After
unknown-view.ts(2,7): error TS2322: Type '"table"' is not assignable to type 'View'.
With a union, TypeScript only lets you do with the value what works for all of its options: for
example, it will not let you return a string | null where a string is expected. For anything
else, you first have to check which one it is. Narrowing is that check: after an if,
TypeScript knows which option is left.
A Pokémon's page has two images: spriteUrl, the small one, which always exists, and
artworkUrl, the large one, which may be missing (null). This function returns a string, so its
return type, after the parentheses, is : string. The object it receives is described right there,
without a name of its own: that is the third way to write an object type. Inside a type, properties
are separated by ;, by ,, or by a line break. If it returns the large image without checking
anything, TypeScript complains, because it could be null:
A function has a type too: that of its parameters and of what it returns, joined by an arrow.
(text: string) => void is "a function that takes a string and returns nothing": void is the
return type of a function that returns no value. You will use it when a component receives a
function through props:
The browser does not understand TypeScript, only JavaScript. Before running, two jobs happen:
Checking the types.tsc does it, and your editor uses the same TypeScript engine to
underline errors as you type.
Removing the types to get JavaScript. tsc can do it or, in a Vite project, a tool Vite uses
under the hood that is much faster because it checks nothing.
A compiler is a program that translates code from one language to another. When the two
languages are as close as TypeScript and JavaScript, the translation is also called
transpiling.
While translating, the types get erased: the JavaScript that reaches the browser has none. This
is what you get from running greet.ts through tsc (the formatting changes too, with different
indentation and a ;, but what matters is that no type is left):
Before
greet.ts
type Trainer = { name: string }export function greet(trainer: Trainer): string { return `Hi, ${trainer.name}`}
After
greet.js
export function greet(trainer) { return `Hi, ${trainer.name}`;}
That has a consequence worth keeping in mind from the start: types protect you while you write the
code, not while it runs. If an API (the server the app asks for data) answers with a different
shape, meaning other properties or other types, TypeScript never finds out. Part 2 shows how to
validate that data when it arrives.
Common mistakes
The usual mistake: silencing an error with any. any is the type that accepts anything:
if you write imageOf(pokemon: any), the red line goes away. But any turns off checking for that
value and for everything computed from it, so the error stops being caught before running. The
fix is to write the real type.
Coming from Vue or Angular
In Angular, TypeScript is the language of every project, and its compiler is built on top of
TypeScript's. Vue 3 has full TypeScript support (<script setup lang="ts">), although many Vue
apps are still written in JavaScript.
One 2026 detail: according to the TypeScript 7 announcement, Vue projects need to stay on
TypeScript 6 for now, and in Angular template checking and editor support also stay on TypeScript
6, although TypeScript 7 works for checking the whole project from the command line (Daniel
Rosenwasser, Announcing TypeScript 7.0). React has no separate templates: JSX lives in .tsx
files, the TypeScript compiler understands that syntax, and TypeScript 7 checks it directly.
Going deeper
TypeScript 7.0 does not ship a programmatic API yet; according to its
announcement, a new one arrives in 7.1. Tools that need it, like typescript-eslint, work by
installing TypeScript 6 alongside it through the @typescript/typescript6 package. Vite's
official React + TypeScript template (create-vite 9.3.4) ships oxlint instead of ESLint. That
template also does not set "strict": true in its tsconfig, and TypeScript still rejects the
untyped props from the previous section, because strict mode has been on by default since
TypeScript 6.0 (Daniel Rosenwasser, Announcing TypeScript 6.0). Narrowing string | null
depends on that mode: without strictNullChecks, which is part of strict, TypeScript would not
tell the null apart. And another difference between type and interface: an interface can
be declared again to add properties (declaration merging); a type cannot.
Conditionals and Lists
In this section you will show or hide parts of the screen and repeat a component for each piece of
data.
Lists with map
In React, a list is built with map: one element per piece of data.
src/lists/CreatureList.tsx
import type { Creature } from '../data/pokemon'export function CreatureList({ creatures }: { creatures: Creature[] }) { return ( <ul> {creatures.map((creature) => ( <li key={creature.id}>{creature.name}</li> ))} </ul> )}
Each element in a list carries a key: a value that tells it apart from the other elements of
the same list. Technically, it is the mark React uses to recognize, from one render to the next,
which element is which, so it moves, adds, or removes only what is needed. It must be unique within
the list and stable, meaning the same for the same piece of data on every render: each creature's
id.
Why not use the index as the key
The map index looks like a handy key, but it does not identify the data: it identifies the
position. In this list each creature has a field to type its nickname. The field does not keep its
value in React: the browser remembers what you typed into it. The aria-label gives the field a
name for screen readers:
Before
src/lists/NicknameList.tsx
import type { Creature } from '../data/pokemon'export function NicknameListByIndex({ creatures }: { creatures: Creature[] }) { return ( <ul> {creatures.map((creature, index) => ( <li key={index}> {creature.name} <input aria-label={`Apodo de ${creature.name}`} /> </li> ))} </ul> )}
Imagine you type "Brote" into Brotín's field, the first one, and then the list changes without
Brotín (for example, because whoever passes the list filters it; in "Lifting State Up" you will build
a filter like that). With the index as the key, React thinks the element at position 0 is still there, just
with a different name now: the field with "Brote" ends up next to Fogarín, which became the first.
With key={creature.id}, the field leaves with Brotín. The example's tests check both cases.
Conditional rendering
Conditional rendering means showing one thing or another depending on the data. You write it
with the usual JavaScript tools:
an early return, with an if before the main return;
the ternary operatorcondition ? a : b, to pick between two;
condition && element, to show something only when the condition holds.
src/lists/Conditional.tsx
import type { Creature } from '../data/pokemon'export function Results({ creatures }: { creatures: Creature[] }) { if (creatures.length === 0) { return <p>Ninguna criatura coincide.</p> } return ( <> <p>{creatures.length === 1 ? '1 criatura' : `${creatures.length} criaturas`}</p> {creatures.length > 5 && <p>Hay muchas: prueba a filtrar.</p>} </> )}
Watch out: React renders nothing for false, null, or undefined, but it does render
numbers. With &&, if the condition is 0, the result is 0 and it shows up on screen. That is
why the example compares (creatures.length > 5) instead of writing creatures.length && ….
State and Events
In this section you will make the screen change when the user acts.
The problem: a regular variable does not update the screen
A button to mark a favorite, storing the mark in a variable:
You click and nothing happens. The variable does change, but React does not find out: it has no
reason to call the component again, so the screen stays the same. And if it did call it again for
some other reason, the function would start over and favorite would be false again.
oxlint, the linter that comes with the template (a program that checks code for common mistakes;
you run it with npm run lint), already warns about it: "Cannot reassign variable after render
completes".
Going deeper
oxlint's full warning. It mentions React Compiler, a tool that optimizes
components at build time and that you will see in part 3.
⚠ react(immutability): Cannot reassign variable after render completes ╭─[src/state/FavoriteWithVariable.tsx:4:29] 1 │ export function FavoriteWithVariable() { 2 │ let favorite = false · ────┬─── · ╰── `favorite` is declared here 3 │ return ( 4 │ <button onClick={() => (favorite = !favorite)}>{favorite ? '★ Favorito' : '☆ Marcar'}</button> · ────┬─── · ╰── Cannot reassign `favorite` after render completes 5 │ ) ╰──── help: Reassigning `favorite` after render has completed can cause inconsistent behavior on subsequent renders. Consider using state instead note: React Compiler skipped optimizing this component or hook. Additional guidance: https://react.dev/reference/eslint-plugin-react-hooks/lints/immutability ⚠ react(immutability): Cannot modify local variables after render completes ╭─[src/state/FavoriteWithVariable.tsx:4:29] 3 │ return ( 4 │ <button onClick={() => (favorite = !favorite)}>{favorite ? '★ Favorito' : '☆ Marcar'}</button> · ─┬ ────┬─── · │ ╰── This modifies `favorite` · ╰── This function may (indirectly) reassign or modify `favorite` after render 5 │ ) ╰──── help: This argument is a function which may reassign or mutate `favorite` after render, which can cause inconsistent behavior on subsequent renders. Consider using state instead note: React Compiler skipped optimizing this component or hook. Additional guidance: https://react.dev/reference/eslint-plugin-react-hooks/lints/immutabilityFound 2 warnings and 0 errors.Finished in N ms on 1 file with 116 rules using 2 threads.
State
State is a component's memory: data React keeps from one render to the next, and that triggers
a new render when it changes. You create it with useState, imported from react:
useState(false) returns an array with two things, pulled out with destructuring: the current value
(favorite) and the function that changes it (setFavorite). When you call setFavorite, React
records the new value and schedules a render; in that render, useState returns the new value.
useState is a hook: a React function that gives a component a capability, in this case,
remembering. React identifies each hook by the order in which it is called, so a hook is always
called at the top level of the component (or of a custom hook, which you will see in part 2): never
inside an if, a loop, a handler, or another nested function, or after an early return. By
convention, its name starts with use.
An event is something that happens on the page: a click, a key press, a change in a field. The
handler is the function that runs when that event happens: here, the one you pass to onClick.
Every render is a snapshot
For now, think of it this way: every render is a snapshot of the component with the values of that
moment. Inside that snapshot, count does not change even if you call setCount: the new value
shows up in the next snapshot. That is why the first block adds one, not two:
export function PlusTwoRight() { const [count, setCount] = useState(0) function addTwo() { setCount((current) => current + 1) setCount((current) => current + 1) } return <button onClick={addTwo}>Nivel {count}</button>}
(Both use import { useState } from 'react', like the previous example.) The two calls in the first
block say the same thing: "set count to this snapshot's value plus 1". The ones in the second use
a functional update: they pass setCount a function that receives the most recent value and
returns the next one. React applies them in order, and the level goes up by two.
A controlled field
A controlled input is a field whose value comes from state: what it shows is text, and every
keystroke updates text. In React, onChange fires on every keystroke, not when you leave the
field, and event.target.value is the field's text at that moment (event is the object
describing the event, and target the element where it happened). That way the value is always
available to the rest of the component, as in this search box:
visible is not separate state: it is computed on every render from text. If a value can be
computed from others, do not store it in state of its own: it would fall out of sync.
Lifting State Up and useReducer
In this section you will share a piece of data between two components and organize its changes. By
the end you will have this part's mini Pokédex.
The problem: two components, one piece of data
The mini Pokédex has a search bar and a list. The search bar changes the filters and the list uses
them. If each keeps its filters in its own state, there is no way for the list to find out what was
typed in the search bar.
Lifting state up
The solution is lifting state up: moving it to the parent of both. The parent keeps the
filters, passes them to the list as props, and passes the search bar functions to change them. That
way there is a single source of truth: one place where each piece of data lives.
First, the filters and the function that applies them. The field is called creatureType, not
type, because further down the reducer's actions use their own type field to say what
happened, and an action with two type fields could not exist:
src/lifting/filters.ts
import type { Creature } from '../data/pokemon'export type Filters = { text: string; creatureType: string }export function applyFilters(creatures: Creature[], filters: Filters): Creature[] { return creatures.filter( (creature) => creature.name.toLowerCase().includes(filters.text.toLowerCase()) && (filters.creatureType === '' || creature.types.includes(filters.creatureType)), )}
The search bar receives the filters and two functions, with the function type you saw in "Why
TypeScript Exists". It has no state of its own: it shows what it receives and reports when something
changes. The functions it receives as props, like onTextChange, are how a child talks to its
parent:
The list receives the filters and shows the creatures that pass. The type inside the import
braces marks Filters as a type only, like import type but for a single name:
src/lifting/FilteredList.tsx
import { creatures } from '../data/pokemon'import { applyFilters, type Filters } from './filters'export function FilteredList({ filters }: { filters: Filters }) { return ( <ul> {applyFilters(creatures, filters).map((creature) => ( <li key={creature.id}>{creature.name}</li> ))} </ul> )}
And the parent keeps the filters in its state and shares them. Every change creates a new object
with spread, without modifying the previous one:
When a piece of state can change in several ways, it pays to gather them in one place. A
reducer is a function that takes the current state and an action, an object describing what
happened, and returns the next state without modifying the previous one:
FiltersAction is a union of three object types (the first | just lines up the list). Each has a
type field with a different string, and the switch narrows just like the if: inside
case 'textChanged', TypeScript knows the action carries text.
With useReducer, the component does not compute the new state: it sends the action to the
reducer with dispatch.
Now every possible change to the filters is in plain sight in filtersReducer, and adding one,
like "clear", means adding a case. A rule of thumb: useState for a value that changes in one way;
useReducer when several actions touch the same state.
This is the part 1 mini Pokédex. App.tsx shows it (in "Styles" you will style it):
src/App.tsx
import { MiniPokedexWithReducer } from './lifting/MiniPokedexWithReducer'export default function App() { return ( <main> <h1>Mini Pokédex</h1> <MiniPokedexWithReducer /> </main> )}
Styles
In this section you will style a component with Tailwind CSS.
Why there are so many ways
With global CSS, a .button class in one file can override the one in another. Several solutions
were born from that: CSS Modules, which makes each file's classes unique; CSS-in-JS, which writes
the style inside the component; and utility CSS, which builds it from small, fixed classes. This
series uses the third, with Tailwind.
Tailwind
Tailwind CSS is a utility-first CSS framework: instead of inventing a class per component,
you combine small classes that each do one thing (px-4 is horizontal padding, text-white the
text color). This series uses version 4. You add it to Vite with its plugin, a package that adds
a capability to Vite (Tailwind CSS, Installing with Vite):
npm install tailwindcss @tailwindcss/vite
The template already ships vite.config.ts with the React plugin; add Tailwind's:
vite.config.ts
import tailwindcss from '@tailwindcss/vite'import react from '@vitejs/plugin-react'import { defineConfig } from 'vite'// https://vite.dev/config/export default defineConfig({ plugins: [react(), tailwindcss()],})
Then replace the entire contents of src/index.css, the stylesheet main.tsx already loads, with
this. The template's styles include rules that would beat Tailwind's classes.
@import 'tailwindcss' brings in Tailwind, and the @theme directive (an instruction Tailwind
reads inside the CSS) defines the project's own values. Each color variable (--color- plus a name, like
--color-brand) produces a family of classes: bg-brand for the background, text-brand for
text, border-brand for the border. In this button, rounded-lg rounds the corners and py-2 is
the vertical padding:
src/styles/TailwindButton.tsx
import type { ReactNode } from 'react'export function TailwindButton({ children }: { children: ReactNode }) { return <button className="rounded-lg bg-brand px-4 py-2 text-white">{children}</button>}
Watch out: Tailwind only generates the classes it finds written out in full in your code. If
you build the name from pieces (`bg-${color}`), the class does not exist. Write the whole
name.
Going deeper
the same button the other two ways. With CSS Modules, which Vite supports
without installing anything, the classes in a .module.css file become unique:
import type { ReactNode } from 'react'import styles from './Button.module.css'export function ModuleButton({ children }: { children: ReactNode }) { return <button className={styles.button}>{children}</button>}
With styled-components, the best-known CSS-in-JS library (installed with
npm install styled-components), the style is part of the component:
styled-components has been in maintenance mode since March 17, 2025: its lead maintainer advises
against adopting it in new projects, although it still ships fixes (Evan Jacobs, Thank you;
version 6.6.0 came out in October 2026). For a new project, Tailwind or CSS Modules.
Coming from Vue or Angular
A table to map what you already know:
In Vue
In Angular
In React
ref()
signal()
useState
computed()
computed()
a value computed during render (or useMemo, part 3)
v-model
[(ngModel)]
value + onChange (controlled input)
props
@Input() / input()
props
emit
@Output() / output()
a function received as a prop
slots
<ng-content>
children
v-if
@if
an if before the return, a ternary, or &&
v-for with :key
@for with track
map with key
.vue / HTML template
HTML template
JSX inside the component
Three differences the table does not show:
React state is a snapshot.ref.value and a signal() return the new value as soon as you
change it; in React, the new value arrives in the next render, which runs the whole component
function again.
State is replaced, not mutated. With a Vue ref you can change a property of an object and the
screen notices; in React you have to create a new object, as the mini Pokédex's spread does.
computed() caches its result and only recomputes when its dependencies change. A value
computed during render is recomputed on every render; to cache it there is useMemo, which you
will see in part 3.
What You Learned
React was born so the screen follows the data without you touching the DOM by hand. You write it
with components, functions that describe what is on screen; you pass them data with props and
compose them with children. TypeScript describes that data and warns you about a mistake before
running. State gives a component memory, and every change schedules a new render; when two
components share a piece of data, you lift it to the parent, and if its changes grow, you organize
them with a reducer. With all that you built a mini Pokédex with search and a type filter.
What's Next
In part 2: Intermediate React
the mini Pokédex goes out into the real world: effects, server data with TanStack Query,
routing with React Router, Context, validated forms, and global state.